BUILDING A TOPOGRAPHIC MODEL
ELLEN P. METZGER
INTRODUCTION
THE ACTIVITIES that follow are from The Best of BAESI, a collection of 19 hand-on
lessons modeled by teacher-participants in the Bay Area Earth Science Institute. BAESI was
founded in 1990 at San Jose University. A non-profit organization supported by the National
Science Foundation, San Jose State University, and a consortium of government, corporate,
and academic partners, BAESI is built on the following observations:
— Earth science is a wonderful tool for attracting more students to science. Kids of all ages are intrigued by dinosaurs, gemstones, tornadoes, and meteors.
— Earth science provides an outstanding opportunity to integrate geology, meteorology,
oceanography, chemistry, biology, physics, and mathematics in a study of our dynamic planet
and its changing life forms.
— Earth science is relevant: hurricanes, earthquakes, mineral resources, air pollution, water quality, and global climate change are issues that touch our lives.
Traditionally, earth science has been considered less important than chemistry, physics and
biology, particularly for college-bound students. As a consequence, very few teachers have
adequate training to offer a quality earth science course or to integrate earth science with
other subjects. In the new National Science Education Standards (National Research Council,1996), earth science has finally reached equality with the other science disciplines and will no longer be viewed as a "lesser" course in our schools. In response to the growing importance of earth science in the pre-college curriculum, the Bay Area Earth Science Institute is working to improve teachers' understanding of fundamental earth science concepts, provide them with state-of-the-art instructional strategies consistent with national and state recommendations for improving science education, and develop and sustain teacher self-confidence.
Since 1990, 197 teachers have attended BAESI's intensive four-week summer workshop and
academic year follow-up activities. About 30 new teachers are recruited each year. An
additional 400 teachers have attended one-day workshops.
 Return to top Return to top
BUILDING A TOPOGRAPHIC MODEL TEACHER'S GUIDE
INTRODUCTION
Purpose: This activity will help students to visualize, in three dimensions, features
represented by contour lines on a topographic map.
Suggested Student Grouping: 2 students per group.
Framework Integration: Themes: Scale and structure; Science Skills: Map reading; ratios. Integrating with other disciplines: Math; Social Studies; Geography.
Related Activities: Submerged Islands.
BACKGROUND INFORMATION
Topographic maps are used extensively by a variety of people including geologists, field
biologists, and hikers. A topographic map is the representation, on a flat surface, of part of the Earth's surface drawn to scale.
Relief — The features shown on topographic maps may be divided into three groups: (1) relief, which includes hills, valleys, mountains, etc.; (2) water features, including lakes, ponds and streams; and (3) cultural features, man-made features like bridges, canals, buildings and roads.
Relief is the difference in elevation between any two points. Where relief is low, the area appears to be relatively flat as in river valleys or broad, flat uplands. When relief is high, the area is steep, as in rugged mountainous terrains. Relief determines the contour interval, which is the difference in elevation between adjacent contour lines. A contour line is an imaginary line on the Earth's surface connecting points of the same elevation. Contour intervals may be large for rugged terrains (80 or 100 feet) or they may be small in areas of low relief (10-20 feet). Contour intervals are consistent for a given map, though they may change from map to map. Usually every fifth contour line (an index contour) is printed heavier than the others and bears the elevation above sea level.
In addition to contour lines, heights of many points occur on the map, such as road
intersections, summits of hills, lake shorelines, etc. These are spot elevations and are accurate to within the nearest foot or meter. More precisely located and more accurate in elevation are bench marks, points marked by brass plates fixed permanently on the ground. On a topographic map, bench marks are represented by crosses and the elevation, preceded by the letters "BM", is printed in black on the map.
Rules of Contour Lines — Some basic rules or facts about contour lines are listed below.
1) Where a contour line crosses a stream or valley, the contour bends to form a "V" that
points upstream or valley. In the upstream direction the successive contours represent higher
elevations.
2) Contours near the upper parts of hills form closures. The top of a hill is higher than the
highest closed contour.
3) Hollows (depressions) without outlets are shown by closed, hatched contours. Hatched
contours are contours with short lines on the inside pointing downslope. The bottom of the
hollow is lower than the lowest closed contour.
4) Contours are widely spaced on gentle slopes.
5) Contours are closely spaced on steep slopes.
6) Evenly spaced contours indicate a uniform slope.
7) Contours do not cross or intersect each other, except in the rare case of an overhanging
cliff.
8) All contours eventually close, either on a map or beyond its margins.
9) A single higher elevation contour never occurs between two lower ones, and vice versa. A
change in slope direction is always determined by the repetition of the same elevation either
as two different contours of the same value or as the same contour crossed twice.
Return to top
Scale — Scale expresses the relationship between distance on the map and the true distance on the Earth's surface. This is generally expressed as a ratio or a fraction, such as 1:24,000 or 1/24,000. The numerator, usually 1, represents map distance, and the denominator, a large number, represents ground distance. Thus, 1:24,000 means that a distance of 1 unit on the map represents 24,000 such units on the ground. The unit here is not important — it could be meters, feet, or inches. What is important is the relationship between the map distance and the true ground distance. The sizes and scales of topographic maps published by the U.S. Geological Survey are shown in Table 1.
Colors and Symbols — Each color on a topographic map has significance as follows:
Blue = water features;
Green = woodlands, orchards, etc.;
Red = urban areas, important roads, public-land boundary lines, civil boundaries;
Black = man-made works;
Brown = contour lines.
Purple = new additions in revised versions; usually man-made features
Table 1. National Topographic map series. Source: U.S. Geological Survey
Notes: 1) South of latitude 31 degrees, 7.5-minute sheets are 23 x 27 inches; 15-minute sheets
are 18 x 21 inches.
2) South of latitude 62 degrees, sheets are 17 x 21 inches.
3) Maps of Alaska and Hawaii vary from these standards
4) North of latitude 42 degrees sheets are 29 x 22 inches. Alaska sheets are 30 x 23 in.
|
Series
|
Scale
|
1 Inch Represents
|
Standard Quadrangle Size (latitude-longitude)
|
Quadrangle Area (mi.2)
|
Paper Size E-W N-S Width Length (inches)
|
Note
|
|
7.5-minute
|
1:24,000
|
2000 feet
|
7.5' x 7.5'
|
49-70
|
22 x 271
|
1
|
|
Puerto Rico 7.5-minute
|
1:20,000
|
about 1,667 feet
|
7.5' x 7.5'
|
71
|
29.5 x 32.5
|
|
|
15-minute
|
1:62,500
|
nearly 1 mile
|
15' x 15'
|
197-282
|
17 x 21
|
1
|
|
Alaska
|
1:63,360
|
1 mile
|
15' x 20'-36'
|
207-281
|
18 x 21 |
2
|
|
U.S. 1:250,000
|
1:250,000
|
nearly 4 miles
|
60' x 120'
|
4,580 to 8,669
|
34 x 22 |
3,4
|
|
U.S. 1:1,000,000
|
1:1,000,000
|
nearly 16 miles
|
240' x 360'
|
73,734 to 102,759
|
27 x 27
|
3
|
MATERIALS
— colored construction paper; at least 8 colors including black
— scissors
— glue
— topographic map model
— card board or Styrofoam spacers
— photocopy from a topographic map (examples included with the student activity sheets)
Return to top
PROCEDURES
1) Students should be introduced to the concepts of relief, scale, and contour intervals before
beginning this activity.
2) Make a model of the landform the students are creating ahead of time. This activity runs
much more smoothly if students can see its end product before they make their own models.
3) Follow the steps on the student activity sheets. Paper clips are useful for attaching the
photocopy of the landform to the construction paper. If your students are making a model of a
feature on a United States Geological Survey topographic map:
— Make an enlarged photocopy from an original topographic map; copy on a light setting so only the darker contours are visible
— For best results, choose a landform from a map with a scale of 1:24,000.
— For simplicity, choose a landform that is represented by no more than 7 index contour lines.
Modifications to increase the challenge:
1) select a landform near the school with which the students are familiar;
2) select a canyon rather than a hill, or;
3) select a large, complex series of hills and canyons, split up the area between groups in the
class to create a 3-D model of a large area. Use cardboard rather than construction paper for
contour layers. Once assembled, cover with paper maché and paint, and add the man-made structures for a more realistic representation of the area modeled.
Extensions: Select an area studied in Social Studies (i.e., Donner Pass) and have students research the ecology of area (animals, plants). Ask them to write a diary of daily travel from the perspective of a pioneer child of their age, describing the topography and ecology of the area.
REFERENCES AND RESOURCES
From the United States Geological Survey: The following General Interest Publications are
available:
"Cartography at the USGS"
"Finding Your Way With Map and Compass"
"Helping Your Child Learn Geography" (available in English and Spanish versions)
"Map Scales"
"Maps Can Help You Trace Your Family Tree"
"Maps of the U.S."
"Maps of the World"
"Topographic Mapping"
For more information and to locate a topographic map of your area:
The pamphlets above, map location indexes for each state, and a list of map symbols are
available free of charge from USGS Map & Book Sales, P.O. Box 25286, Denver, CO 80225. Topographic maps may be purchased from the same address. For more information call 1-800-USA-MAPS.
A related activity:
"Mt. St. Helens Hike" — a set of 59 slides with a detailed teacher's guide, annotated
illustrations, glossary, topographic maps, topographic profiles, etc. Allows students to
experience a hike up the north slope of Mt. St. Helens via topographic maps and photographs.
Produced by the National Earth Science Teachers Association. For prices and ordering
information contact NESTA/MSTA Publications, C/O Lisa Bouda, 28815 Ironwood, Warren,
MI 48093.
Return to top
GLOSSARY
bench marks — precisely located points of elevation marked by brass plates fixed permanently to the ground. On a topographic map, bench marks are represented by crosses and the elevation, preceded by the letters BM, is printed in black on the map.
contour interval — the difference in elevation between adjacent contour lines on a map.
contour line — an imaginary line on the Earth's surface connecting points of the same elevation.
index contour — on a topographic map, a contour that is printed heavier than others and is usually labeled with the elevation it represents. Index contours occur at regular intervals, often every fifth or every fourth contour line (depending on the contour interval).
relief — the difference in elevation between any two points.
scale — expresses the relationship between distance on the map and the true distance on the Earth's surface.
spot elevations — elevations of road intersections, summits of hills, lake shorelines, etc. These are accurate to within the nearest foot or meter.
topographic map — the representation on a flat surface of part of the Earth's surface drawn to scale. Most topographic maps also show land boundaries and other man-made features.
BUILDING A TOPOGRAPHIC MODEL
INTRODUCTION
Topographic maps show the shapes and features of the Earth's surface. A contour line
connects places on the map which have the same elevation. To demonstrate the different
elevations shown on a two dimensional topographic map, you can build a 3-dimensional
model.
PURPOSE
To make paper models that portray, in three dimensions, features represented by contour lines
on a topographic map.
MATERIALS
— colored construction paper; at least 8 colors (including black)
— photocopy of a landform from a topographic map
— cardboard or Styrofoam spacers
PROCEDURES
Note: if the landform you are making a model of has a number of closely spaced contour
lines, cut along the index contours (i.e., the ones that are marked with the heaviest lines).
1) Place the photocopy of the landform on top of the black construction paper.
2) Carefully cut along the contour line representing the lowest elevation. Label the center of
the construction paper with a "1." This is the first level of the model which you will build.
3) Set aside the construction paper.
4) Place the photocopy of the landform on top of a different color of construction paper (the
color you use does not matter) and carefully cut around the next contour line. Label the center
of the construction paper with a "2". This is the second level of your model.
5) Repeat this procedure until you have cut out all of the contour lines. Don't forget to label the layer with the appropriate number.
6) Now you are ready to build your 3-D model. Take layer number 2 and glue the spacers to
the bottom of the construction paper. The spacers represent the increase in elevation between
each contour line (contour interval).
7) Glue layer 2 onto the top of the first layer.
8) Repeat Step 6 and 7 with the rest of your layers until you have built your model.
Return to top
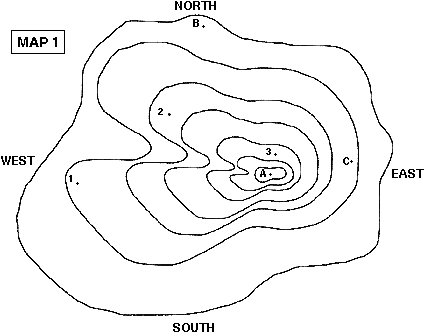
QUESTIONS (to go with Map 1 below)
1) If black (the first layer of your model) is sea level, what elevation is each of the following
points? (the contour interval = 10 ft.)
|
A
|
_______
|
B
|
_______
|
C
|
_______
|
|
1
|
_______
|
2
|
_______
|
3
|
_______
|
2) Which is the steepest slope on the hill? (north, south, east, or west?)
How do you know?
3) What is the difference in elevation between the second and fourth layers of your model?
4) If you were to build a house on this hill, where is the flattest part of the land form? Draw a house on the topographic map.

|